Thursday 27 December 2012


CORBA Technology and the JavaTM 2 Platform, Standard Edition


The Java 2 Platform, Standard Edition, v1.4, provides an Object Request Broker (ORB) and two CORBA programming models that can utilize the Java CORBA ORB and Internet InterORB Protocol (IIOP). This topic discusses these options for creating and distributing CORBA technology.
CORBA technology is an integral part of the Java 2 platform. It consists of an Object Request Broker (ORB), APIs for the the RMI programming model, and APIs for the the IDL programming model.
For more information on which specifications are implemented in this release of the Java platform, see the compliance document.

How does J2SE leverage CORBA

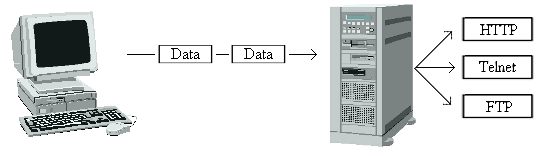
Common Object Request Broker Architecture (CORBA) technology is the open standard for heterogeneous computing. CORBA complements the JavaTM platform by providing a distributed object framework, services to support that framework, and interoperability with other languages. The Java platform complements CORBA by providing "Write Once, Run AnywhereTM" portability, a highly productive implementation environment, and a very robust platform. By combining the Java platform with CORBA and other key enterprise technologies, the Java 2 Platform is the ultimate platform for distributed technology solutions.
CORBA standards provide the proven, interoperable infrastructure to the Java platform. IIOP (Internet Inter-ORB Protocol) manages the communication between the object components that power the system. The Java platform provides a portable object infrastructure that works on every major operating system. CORBA provides the network transparency, Java provides the implementation transparency.

The Object Request Broker

An Object Request Broker (ORB) is part of the Java 2 Platform, Standard Edition, since version 1.3. The ORB is a runtime component that can be used for distributed computing using IIOP communication.
NOTE: Although it is true that ORBs written in different languages should be able to talk to each other, we haven't tested the interoperability of the Java ORB with other vendor's ORBs.
The Object Management Group (OMG) is an industry consortium that creates and publishes specifications for CORBA. Vendors implement the specifications to produce products known as Object Request Brokers (ORB). The good news for developers is that the JavaTM Standard Edition, v1.2 and higher includes an ORB that is available in every deployment of the Java 2 Platform, Standard Edition. To read more about the ORB class, follow the link.
The Java CORBA ORB supports both the RMI and IDL programming models, both of which can use the underlying IIOP wire-level protocol for communication.

Introducing the CORBA Programming Models

History of the CORBA Programming Models

In 1997, Remote Method Invocation, or RMI, was introduced in JDK 1.1. Initially, RMI was positioned as a natural outgrowth of Remote Procedure Calls (RPC), strictly for enabling calls to be made between Java objects in different virtual machines, and even on different physical machines.
In 1998, came JDK 1.2, which introduced Java IDL, a Java API for interoperability and integration with CORBA. Java IDL included both a Java-based ORB, which supported IIOP, and the IDL-to-Java compiler, idltojava, for generating client-side stubs and server-side code skeletons. The ORB supports both the RMI over IIOP and Java IDL programming models.

In 1999, the RMI over IIOP standard extension to the Java platform was introduced for JDK 1.1.6 and 1.2. Now that RMI over IIOP is integrated into J2SE version 1.3 and higher, the optional download has been end-of-lifed, but is still available from the archives.
The OMG finalized modifications of its IIOP specification so that it would support most of the JDK 1.1 functionality of RMI. RMI over IIOP was introduced as a standard extension to JDK 1.2. This enabled remote objects written in the Java programming language to be accessible from any language via IIOP.
J2SE, v.1.3 introduced a new, 100% Pure JavaTM, IDL-to-Java compiler, idlj, along with support for IDL abstract interfaces and value types. Also in v.1.3, RMI over IIOP is included in the JDK.
J2SE v.1.4, the current version, was introduced in 2001, and includes support for the Portable Object Adapter, Portable Interceptors, Interoperable Naming Service, GIOP 1.2, and Dynamic Anys. J2SE v.1.4 also includes an Object Request Broker Daemon (ORBD), which is used to enable clients to transparently locate and invoke persistent objects on servers in the CORBA environment, and servertool, which provides a command-line interface for application programmers to register, unregister, startup, and shutdown a persistent server. For more information on new features in J2SE v.1.4, see Changes in CORBA Features Between J2SE 1.3 and 1.4.

Comparing the CORBA Programming Models

Cross-language, cross-vendor interoperability is achieved via the Internet InterORB Protocol, or IIOP. IIOP is a transport protocol for distributed applications written in either IDL or Java RMI.
When using the IDL programming model, the interface is everything! It defines the points of entry that can be called from a remote process, such as the types of arguments the called procedure will accept, or the value/output parameter of information returned. Using IDL, the programmer can make the entry points and data types that pass between communicating processes act like a standard language.
CORBA is a language-neutral system in which the argument values or return values are limited to what can be represented in the involved implementation languages. In CORBA, object orientation is limited only to objects that can be passed by reference (the object code itself cannot be passed from machine-to-machine) or are predefined in the overall framework. Passed and returned types must be those declared in the interface.
With RMI, the interface and the implementation language are described in the same language, so you don't have to worry about mapping from one to the other. Language-level objects (the code itself) can be passed from one process to the next. Values can be returned by their actual type, not the declared type. Or, you can compile the interfaces to generate IIOP stubs and skeletons which allow your objects to be accessible from other CORBA-compliant languages.

The RMI Programming Model

What is the RMI Programming Model

The RMI Programming model is a general object model for distributed computing via the rmi API. You can choose to work completely within the Java programming language, using the Java Remote Method Protocol (JRMP) or work with other CORBA-compliant programming languages using the Internet InterORB Protocol (IIOP).
The RMI programming model is part of the JavaTM 2 Platform, Standard Edition, and consists of both an Object Request Broker (ORB) and the rmic compiler. The rmic compiler is used to generate stubs, skeletons, and ties for remote objects using either the JRMP or IIOP protocols. The rmic compiler can also generates OMG IDL. For more information on using rmic, link to rmic - The Java RMI Stub Compiler.
The RMI over IIOP Programmer's Guide discusses the differences between using RMI with JRMP or IIOP.

When should I use the RMI programming model instead of the IDL programming model?

The RMI programming model speeds distributed application development by allowing developers to work completely in the Java programming language. When using the RMI programming model to produce Java technology-based distributed applications, there is no separate Interface Definition Language (IDL) or mapping to learn. The RMI programming model provides flexibility by allowing developers to pass any serializable Java object (Objects By Value) between application components. Like the IDL programming model, the RMI programming model is based on open standards defined with the participation of hundreds of vendors and users in the Java Community Process (JCP). Like the IDL programming model, the RMI programming model can use the Internet Inter-ORB Protocol (IIOP) as its communication protocol. IIOP eases legacy application and platform integration by allowing application components written in C++, Smalltalk, and other CORBA supported languages to communicate with components running on the Java platform.
With the RMI programming model, developers can write remote interfaces in the Java programming language and implement them simply using Java technology and the Java RMI APIs. These interfaces can be implemented in any other language that is supported by an OMG mapping and a vendor supplied ORB for that language. Similarly, clients can be written in other languages using IDL derived from the remote Java technology-based interfaces.

Where can I found out more about the RMI programming model

The IDL Programming Model

What is the IDL Programming Model

The IDL programming model, known as JavaTM IDL, consists of both the Java CORBA ORB and the idlj compiler that maps the OMG IDL to Java bindings that use the Java CORBA ORB, as well as a set of APIs, which can be explored by selecting the org.omg prefix from the Package section of the API index.
Java IDL adds CORBA (Common Object Request Broker Architecture) capability to the Java platform, providing standards-based interoperability and connectivity. Java IDL enables distributed Web-enabled Java applications to transparently invoke operations on remote network services using the industry standard IDL (Object Management Group Interface Definition Language) and IIOP (Internet Inter-ORB Protocol) defined by the Object Management Group. Runtime components include a Java ORB for distributed computing using IIOP communication.
To use the IDL programming model, you define remote interfaces using the Object Management Group's (OMG) Interface Definition Language (IDL), then compile the interfaces using the idlj compiler. When you run the idljcompiler over your interface definition file, it generates the Java version of the interface, as well as the class code files for the stubs and skeletons that enable your applications to hook into the ORB.
JavaTM IDL is part of the Java 2 Platform, Standard Edition, v1.2 and above. To develop applications with Java IDL, use JavaTM IDL Compileridlj, which is included in every installation of J2SE v1.3 and higher.


When should I use the IDL programming model instead of the RMI programming model?

The OMG IDL (Interface Definition Language) is a purely declarative language designed for specifying programming-language-independent operational interfaces for distributed applications. OMG specifies a mapping from IDL to several different programming languages, including Java, C, C++, Lisp, Python, Smalltalk, COBOL, and Ada. When mapped, each statement in OMG IDL is translated to a corresponding statement in the programming language of choice. Java IDL is an implementation of the CORBA specification. For example, you could use the Java IDL Compiler, idlj, to map an IDL interface to Java and implement the client class in Java. If you map the same IDL to C++, using an IDL-to-C++ compiler and a C++ ORB, and implement the server in that language, the Java client and C++ server interoperate through the ORB.

NOTE: Although it is true that ORBs written in different languages should be able to talk to each other, we haven't tested the interoperability of the Java ORB with other vendor's ORBs.
Where can I find out more about the IDL programming model

Comparison of IDL and RMI programming models

There are several scenarios that will define how you will want to create distributed CORBA applications. Here are some of them:

  • If you have been developing CORBA applications using IDL for some time, you will probably want to stay in this environment. Create the interfaces using IDL, and define the client and server applications using the Java programming language to take advantage of its "Write Once, Run AnywhereTM" portability, its highly productive implementation environment, and its very robust platform.
  • If all of your applications are written in the Java programming language, you will probably want to use Java RMI to enable communication between Java objects on different virtual machines and different physical machines. Using Java RMI without its IIOP option leverages its strengths of code portability, security, and garbage collection.
  • If you are writing most of your new applications using the Java programming language, but need to maintain legacy applications written in other programming languages as well, you will probably want to use Java RMI with itsIIOP compiler option.

What about CORBA and J2EE?

In addition to Java IDL and RMI over IIOP, J2EE includes Enterprise JavaBeansTM technology (EJBTM).
Enterprise JavaBeans is part of the Java 2 Platform, Enterprise Edition. The EJB server-side component model simplifies development of middleware components that are transactional, scalable, and portable. EJB servers reduce the complexity of developing middleware by providing automatic support for middleware services such as transactions, security, database connectivity, and more.
EJBs use RMI over IIOP for their distributed object model, and use the Java Transaction Service (JTS) for their distributed transaction model. When Enterprise JavaBeans are implemented using the RMI over IIOP protocol for EJB interoperability in heterogeneous server environments, the standard mapping of the EJB architecture to CORBA enables the following interoperability:

  • A Java client using an ORB from one vendor can access enterprise beans residing on an EJB server provided by another vendor.
  • Enterprise beans in one EJB server can access enterprise beans in another EJB server.
  • A non-Java platform CORBA client can access any enterprise bean object.


NAM 2 Code for Network simulation


#code for changing value of size by using the command line
if {$argc == 1}{
set size [lindex $argv 0]
}
else {
puts "Usage: ns $argv 0 size"
exit 1
}

#Section 1
#Create a simulator object
set ns [new Simulator]

#Section 2
#Open the nam trace file
set nf [open out.nam w]
$ns namtrace-all $nf

#Section 3
#Define a 'finish' procedure
proc finish {} {
global ns nf
$ns flush-trace
#Close the trace file
close $nf
#Execute nam on the trace file
#exec nam out.nam &
exit 0
}

#Section 4
#Create nodes named n0-n6 according to cities 1-7
set n0 [$ns node]
set n1 [$ns node]
set n2 [$ns node]
set n3 [$ns node]
set n4 [$ns node]
set n5 [$ns node]
set n6 [$ns node]

#Connect nodes n0-n6 by a duplex links with DropTail queuing
#Bandwidth 2Mb/s
#Delay = Link distance in km * 1000/speed of light(300000000)

#Central node5(City6) links
$ns duplex-link $n5 $n6 2Mb 1.4ms DropTail
$ns duplex-link $n5 $n1 2Mb 0.7ms DropTail
$ns duplex-link $n5 $n4 2Mb 2ms DropTail
$ns duplex-link $n5 $n3 2Mb 0.3ms DropTail

#node2( city 2) links
$ns duplex-link $n2 $n6 2Mb 1.3ms DropTail
$ns duplex-link $n2 $n1 2Mb 1.9ms DropTail

#node0(city 1) links
$ns duplex-link $n0 $n4 2Mb 0.27ms DropTail
$ns duplex-link $n0 $n3 2Mb 2.5ms DropTail

#Set the queue limit for each link using variable $size
$ns queue-limit $n5 $n6 $size
$ns queue-limit $n5 $n1 $size
$ns queue-limit $n5 $n4 $size
$ns queue-limit $n5 $n3 $size

$ns queue-limit $n2 $n6 $size
$ns queue-limit $n2 $n1 $size

$ns queue-limit $n0 $n4 $size
$ns queue-limit $n0 $n3 $size

#Create TCP connections between cities
#HTML server connections for city 3(n2) links
set tcp0 [$ns create-connection TCP $n2 TCPSink $n0 1]
set tcp1 [$ns create-connection TCP $n2 TCPSink $n1 1]
set tcp2 [$ns create-connection TCP $n2 TCPSink $n3 1]
set tcp3 [$ns create-connection TCP $n2 TCPSink $n4 1]
set tcp4 [$ns create-connection TCP $n2 TCPSink $n5 1]
set tcp5 [$ns create-connection TCP $n2 TCPSink $n6 1]

#FTP server connections for city 6(n5) links
set tcp6 [$ns create-connection TCP $n5 TCPSink $n0 1]
set tcp7 [$ns create-connection TCP $n5 TCPSink $n1 1]
set tcp8 [$ns create-connection TCP $n5 TCPSink $n2 1]
set tcp9 [$ns create-connection TCP $n5 TCPSink $n3 1]
set tcp10 [$ns create-connection TCP $n5 TCPSink $n4 1]
set tcp11 [$ns create-connection TCP $n5 TCPSink $n6 1]

#Create Application/Traffic/Exponential sources exp0-exp11
set exp0 [new Application/Traffic/Exponential]
set exp1 [new Application/Traffic/Exponential]
set exp2 [new Application/Traffic/Exponential]
set exp3 [new Application/Traffic/Exponential]
set exp4 [new Application/Traffic/Exponential]
set exp5 [new Application/Traffic/Exponential]
set exp6 [new Application/Traffic/Exponential]
set exp7 [new Application/Traffic/Exponential]
set exp8 [new Application/Traffic/Exponential]
set exp9 [new Application/Traffic/Exponential]
set exp10 [new Application/Traffic/Exponential]
set exp11 [new Application/Traffic/Exponential]

#Set the packet size,burst time,idle time and transmission rate for sources exp0-ex11
#burst time = bandwidth * 0.1
#Idle time =0.1-burst time
$exp0 set packetSize_ 500
$exp0 set burst_time_ 0.01
$exp0 set idle_time_ 0.09
$exp0 set rate_ 1Mb

#exp1 source
$exp1 set packetSize_ 500
$exp1 set burst_time_ 0.01
$exp1 set idle_time_ 0.09
$exp1 set rate_ 1Mb

#exp2 source
$exp2 set packetSize_ 500
$exp2 set burst_time_ 0.05
$exp2 set idle_time_ 0.05
$exp2 set rate_ 1Mb

#exp3 source
$exp3 set packetSize_ 500
$exp3 set burst_time_ 0.07
$exp3 set idle_time_ 0.03
$exp3 set rate_ 1Mb

#exp4 source
$exp4 set packetSize_ 500
$exp4 set burst_time_ 0.02
$exp4 set idle_time_ 0.08
$exp4 set rate_ 1Mb

#exp5 source
$exp5 set packetSize_ 500
$exp5 set burst_time_ 0.05
$exp5 set idle_time_ 0.05
$exp5 set rate_ 1Mb

#exp6 source
$exp6 set packetSize_ 500
$exp6 set burst_time_ 0.03
$exp6 set idle_time_ 0.07
$exp6 set rate_ 1Mb

#exp7 source
$exp7 set packetSize_ 500
$exp7 set burst_time_ 0.06
$exp7 set idle_time_ 0.04
$exp7 set rate_ 1Mb

#exp8 source
$exp8 set packetSize_ 500
$exp8 set burst_time_ 0.09
$exp8 set idle_time_ 0.01
$exp8 set rate_ 1Mb

#exp9 source
$exp9 set packetSize_ 500
$exp9 set burst_time_ 0.08
$exp9 set idle_time_ 0.02
$exp9 set rate_ 1Mb

#exp10 source
$exp10 set packetSize_ 500
$exp10 set burst_time_ 0.04
$exp10 set idle_time_ 0.06
$exp10 set rate_ 1Mb

#exp11 source
$exp11 set packetSize_ 500
$exp11 set burst_time_ 0.07
$exp11 set idle_time_ 0.03
$exp11 set rate_ 1Mb

#Attach the source agents from exp0-11 to tcp0-11 accordingly
$exp0 attach-agent $tcp0
$exp1 attach-agent $tcp1
$exp2 attach-agent $tcp2
$exp3 attach-agent $tcp3
$exp4 attach-agent $tcp4
$exp5 attach-agent $tcp5
$exp6 attach-agent $tcp6
$exp7 attach-agent $tcp7
$exp8 attach-agent $tcp8
$exp9 attach-agent $tcp9
$exp10 attach-agent $tcp10
$exp11 attach-agent $tcp11

#Tell the sources when to start
$ns at 0.1 "$exp0 start"
$ns at 0.1 "$exp1 start"
$ns at 0.1 "$exp2 start"
$ns at 0.1 "$exp3 start"
$ns at 0.1 "$exp4 start"
$ns at 0.1 "$exp5 start"
$ns at 0.1 "$exp6 start"
$ns at 0.1 "$exp7 start"
$ns at 0.1 "$exp8 start"
$ns at 0.1 "$exp9 start"
$ns at 0.1 "$exp10 start"
$ns at 0.1 "$exp11 start"

#Section 5
#Call the finish procedure at the end of the simulation time
$ns at 1.0 "finish"

#Section 6
#Run the simulation
$ns run

Saturday 22 September 2012

The if-then and if-then-else Statements


The if-then Statement

The if-then statement is the most basic of all the control flow statements. It tells your program to execute a certain section of code only if a particular test evaluates to true. For example, the Bicycle class could allow the brakes to decrease the bicycle's speed only if the bicycle is already in motion. One possible implementation of the applyBrakes method could be as follows:
void applyBrakes() {
    // the "if" clause: bicycle must be moving
    if (isMoving){ 
        // the "then" clause: decrease current speed
        currentSpeed--;
    }
}
If this test evaluates to false (meaning that the bicycle is not in motion), control jumps to the end of the if-then statement.
In addition, the opening and closing braces are optional, provided that the "then" clause contains only one statement:
void applyBrakes() {
    // same as above, but without braces 
    if (isMoving)
        currentSpeed--;
}
Deciding when to omit the braces is a matter of personal taste. Omitting them can make the code more brittle. If a second statement is later added to the "then" clause, a common mistake would be forgetting to add the newly required braces. The compiler cannot catch this sort of error; you'll just get the wrong results.

The if-then-else Statement

The if-then-else statement provides a secondary path of execution when an "if" clause evaluates to false. You could use an if-then-else statement in theapplyBrakes method to take some action if the brakes are applied when the bicycle is not in motion. In this case, the action is to simply print an error message stating that the bicycle has already stopped.
void applyBrakes() {
    if (isMoving) {
        currentSpeed--;
    } else {
        System.err.println("The bicycle has " + "already stopped!");
    } 
}
The following program, IfElseDemo, assigns a grade based on the value of a test score: an A for a score of 90% or above, a B for a score of 80% or above, and so on.
class IfElseDemo {
    public static void main(String[] args) {

        int testscore = 76;
        char grade;

        if (testscore >= 90) {
            grade = 'A';
        } else if (testscore >= 80) {
            grade = 'B';
        } else if (testscore >= 70) {
            grade = 'C';
        } else if (testscore >= 60) {
            grade = 'D';
        } else {
            grade = 'F';
        }
        System.out.println("Grade = " + grade);
    }
}
The output from the program is:
    Grade = C
You may have noticed that the value of testscore can satisfy more than one expression in the compound statement: 76 >= 70 and 76 >= 60. However, once a condition is satisfied, the appropriate statements are executed (grade = 'C';) and the remaining conditions are not evaluated.

Monday 17 September 2012

What is a class in JAVA


In the real world, you'll often find many individual objects all of the same kind. There may be thousands of other bicycles in existence, all of the same make and model. Each bicycle was built from the same set of blueprints and therefore contains the same components. In object-oriented terms, we say that your bicycle is an instance of the class of objects known as bicycles. A class is the blueprint from which individual objects are created.
The following Bicycle class is one possible implementation of a bicycle:
class Bicycle {

    int cadence = 0;
    int speed = 0;
    int gear = 1;

    void changeCadence(int newValue) {
         cadence = newValue;
    }
    void changeGear(int newValue) {
         gear = newValue;
    }
    void speedUp(int increment) {
         speed = speed + increment;   
    }
    void applyBrakes(int decrement) {
         speed = speed - decrement;
    }
    void printStates() {
         System.out.println("cadence:" +
             cadence + " speed:" + 
             speed + " gear:" + gear);
    }
}
The syntax of the Java programming language will look new to you, but the design of this class is based on the previous discussion of bicycle objects. The fieldscadencespeed, and gear represent the object's state, and the methods (changeCadencechangeGearspeedUp etc.) define its interaction with the outside world.
You may have noticed that the Bicycle class does not contain a main method. That's because it's not a complete application; it's just the blueprint for bicycles that might be used in an application. The responsibility of creating and using new Bicycle objects belongs to some other class in your application.
Here's a BicycleDemo class that creates two separate Bicycle objects and invokes their methods:
class BicycleDemo {
    public static void main(String[] args) {

        // Create two different 
        // Bicycle objects
        Bicycle bike1 = new Bicycle();
        Bicycle bike2 = new Bicycle();

        // Invoke methods on 
        // those objects
        bike1.changeCadence(50);
        bike1.speedUp(10);
        bike1.changeGear(2);
        bike1.printStates();

        bike2.changeCadence(50);
        bike2.speedUp(10);
        bike2.changeGear(2);
        bike2.changeCadence(40);
        bike2.speedUp(10);
        bike2.changeGear(3);
        bike2.printStates();
    }
}

The output of this test prints the ending pedal cadence, speed, and gear for the two bicycles:
cadence:50 speed:10 gear:2
cadence:40 speed:20 gear:

Source:http://docs.oracle.com

Thursday 13 September 2012

Video buffering


A buffer contains data that is stored for a short amount of time, typically in the computer's memory (RAM). The purpose of a buffer is to hold data right before it is used. For example, when you download an audio or video file(watching youtube video) from the Internet, it may load the first 20% of it into a buffer and then begin to play. While the clip plays back, the computer continually downloads the rest of the clip and stores it in the buffer. Because the clip is being played from the buffer, not directly from the Internet, there is less of a chance that the audio or video will stall or skip when there is network congestion.
Buffering is used to improve several other areas of computer performance as well. Most hard disks use a buffer to enable more efficient access to the data on the disk. Video cards send images to a buffer before they are displayed on the screen (known as a screen buffer). Computer programs use buffers to store data while they are running. If it were not for buffers, computers would run a lot less efficiently and we would be waiting around a lot more.

Hacking(not cracking)


Watch a Chinese military hacker launch a successful attack


Download free software using Pirate Bay
https://thepiratebay.se

Download Torrents safely using torch browser

http://www.torchbrowser.com/

Anonymity online

Internet Addressing with Java etc.


There are several communications mechanisms that we can use to provide network services. We could use UDP (unreliable datagram protocol), or TCP (transfer-control protocol). For the purposes of this tutorial, we'll choose TCP, because it makes life much easier. TCP guarantees that messages will arrive at their destination. UDP is unreliable, and your application isn't notified if the message is lost in transit. Also, many protocols (such as HTTP, SMTP, POP & FTP) use TCP, so it's important that you are familiar with it for networking in Java.

Internet Addressing with Java

Handling internet addresses (domain names, and IP addresses) is made easy with Java. Internet addresses are represented in Java by the InetAddress class. InetAddress provides simple methods to convert between domain names, and numbered addresses.
We start by importing the java.net package, which contains a set of pre-written networking routines (including InetAddress).
import java.net.*;
Next, we declare a new variable of type InetAddress, which we assign the value of the local host machine (for machines not connected to a network, this should represent 127.0.0.1). Due to the fact that InetAddresses can generate exceptions, we must place this code between a try .. catch UnknownHostException block.
// Obtain the InetAddress of the computer on which this program is running
InetAddress localaddr = InetAddress.getLocalHost();
The InetAddress class has methods that return the IP address as an array of bytes (which can be easily converted into a string), as well as a string representation of its domain name (e.g. mydomain.org ). We can print out the InternetAddress, as well as the domain name of the local address.
System.out.println ("Local IP Address : " + localaddr );
System.out.println ("Local hostname : " + localaddr.getHostName());
public class MyFirstInternetAddress
{
 public static void main(String args[])
 {
  try
  {
   InetAddress localaddr = InetAddress.getLocalHost();
   
   System.out.println ("Local IP Address : " + localaddr );
   System.out.println ("Local hostname   : " + localaddr.getHostName());
  }
  catch (UnknownHostException e)
  {
   System.err.println ("Can't detect localhost : " + e);
  }
  
 }

 /** Converts a byte_array of octets into a string */
 public static String byteToStr( byte[] byte_arr )
 {
  StringBuffer internal_buffer = new StringBuffer();

  // Keep looping, and adding octets to the IP Address
  for (int index = 0; index < byte_arr.length -1; index++)
  {
   internal_buffer.append ( String.valueOf(byte_arr[index]) + ".");
  }
  
  // Add the final octet, but no trailing '.'
  internal_buffer.append ( String.valueOf (byte_arr.length) );

  return internal_buffer.toString();
 }
}
Compile and run this application, and you should be told your local IP address, and hostname. Don't worry if your computer isn't connected to the Internet, though. Providing your system has a TCP stack, it should give you back an IP address even if you aren't currently connected. On most systems, you can refer to your local machine (which often has the hostname "localhost") as IP address 127.0.0.1
Why would every machine that's not connected to the Internet have the same address? This address is known as a loopback address. Every time you connect to this address, you're actually connected to your local machine. So, if you were running a local webserver, and you pointed your browser to http://127.0.0.1, you should see your web-site. But if I were to go to the same address, I'd connect to a different site - that of my own machine.
This is great when developing Java applications. You don't need a permanent connection to the Internet - you can run client and server applications on your own machine. This is handy, because writing and testing client/server applications can take some time, and unless you have a permanant connection, you wouldn't want to be billed on an hourly rate by your ISP!

Writing a TCP client in Java

Writing network client in Java is very simple. If you've ever written a network client in C, you'll know how complicated it can be. You have to be concerned with structures, and pointers. Java cuts out this complexity, through its java.net.Socket class. To demonstrate just how easy Java makes it, I'm going to show you how to write a finger client.
For those who are unfamiliar with the finger protocol, I'll briefly explain how it works. Finger allows a remote user to query a host machine for information, either about the host machine in general or a specific user. Most unix systems support finger, and many non-Unix systems also support the protocol. Most finger applications take as a paramater 'username@hostmachine'.
Finger clients connect to a host server at port 79 and establish a TCP stream. The client sends the username (or a blank, for a general query), followed by a newline character. The server then sends back information about the user, in the form of a text stream. This should be displayed to the user, and then the connection should be terminated.
As with any networking application in Java, we need to first import the network and input/output packages.
import java.io.*;
import java.net.*;
Our application should have a single method, main, which is responsible for issuing a finger query. The first step is to validate and parse the command line paramaters, looking for a username and hostname.
public static void main ( String args[] )
{
 // Check command line paramaters
 if (args.length != 1)
 {
  System.err.println ("Invalid paramaters");
  System.exit(1);
 }
 else
 // Check for existence of @ in paramater
 if (args[0].indexOf("@") == -1)
 {
  System.err.println ("Invalid paramater : syntax user@host");
  System.exit(1);
 }

 // Split command line paramater at the @ character
 String username = args[0].substring(0, args[0].indexOf("@") );
 String hostname = args[0].substring(args[0].indexOf("@") +1, args[0].length());

 ........
}
In the code above, we check that only a single paramater has been entered, and also that there exists an '@' character in the paramater. The next step is to split the command line paramater into a username and a hostname. To do this, we rely on the substring method which can be applied to any string. Username becomes the string from offset 0, to the first index of character '@'. Hostname becomes the string from the first index of character '@', to the length of the original paramater.
Figure 2.0 - Extracting username & hostname from command-line parameter
The next step is to connect to the finger server, which opperates on port 79. As with the previous example, we must enclose our network code inside of a try { ... } catch block. This allows us to trap any network errors that may occur (such as invalid hostnames, or an inability to connect with the server). You'll notice that the code to create a TCP collection is actually only a single line - networking in Java is very easy.
try
{
 // Create a connection to server
 Socket s = new Socket(hostname, 79);

 // Remainder of finger client code goes here
 .........

}
catch (SocketException e )
{
 System.err.println ("Socket error : " + e);
}
catch (UnknownHostException e )
{
 System.err.println ("Invalid host!");
}
catch (IOException e )
{
 System.err.println ("I/O error : " + e);
}
After connecting to port 79 of the finger server, we now have to obtain input and output streams for the socket. We can treat these streams then just as we would file or text input and output. For ease of use we'll covert the input stream into a DataInputStream, and the output stream into a PrintStream. This will allow us to use the readLine and println methods with our socket streams.
// Create input and output streams to socket
PrintStream out = new PrintStream( s.getOutputStream()) ;
DataInputStream in = new DataInputStream(s.getInputStream());
Using our PrintStream out, we write the name of the user we wish to find out information about to the finger server. The server will process the query, and output a result, which we will print to the user's screen.
// Write username to socket output
out.println( username );

// Read response from socket
System.out.println ( in.readLine() );

// Read remaining finger response
String line = in.readLine();

while (line != null)
{
 System.out.println ( line );

 // Read next line
 line = in.readLine();
}
The first line is read from the input stream, and then printed to screen. We then enter a loop, checking to see if there are any more lines to display. The while loop terminates when there are no more bytes available.
Finally, we must close the connection to our finger server. With this last statement, our finger client is complete!
// Terminate connection
s.close();
While the example program functions as a finger client, it can easily be used as a TCP client skeleton, substituting the connection to port 79 with another port matching the application protocol you are trying to use, and modifying the read/write routines to send different data.

Running the example client

To run the client, you'll need to be connected to the Internet (this example requires a direct connection, and won't run behind a firewall). To execute, you need to know the name of a user, and the site on which the user resides. For example, to finger dodo@fan.net.au, you would do the following
java TCP_Finger_Client dodo@fan.net.au

Tip - Not all ISP's run finger servers, so you won't be able to finger every user. The example above should work, however (providing my ISP doesn't change its policy).

Summary

Writing network applications in Java is extremely easy. Java takes away much of the implementation details which are operating system specific. There's no need to worry about hostname lookups, size of IP address structures, or pointers. The java.net package provides all this functionality for you, and provides a simple way to write networking clients. However, when writing Java applets (as opposed to applications), remember that the browser may impose security restrictions - many applets can only communicate with the host from which they were downloaded from.

Additional Resources

Merlin Hughes, et al. Java Network Programming, Manning Publications, 1997.
Reilly, D. Java Network Programming FAQ (online) available at http://www.davidreilly.com/java/java_network_programming/

OSI Reference model


OSI Model
Data unitLayerFunction
Host
layers
Data7. ApplicationNetwork process to application
6. PresentationData representation, encryption and decryption, convert machine dependent data to machine independent data
5. SessionInterhost communication, managing sessions between applications
Segments4. TransportEnd-to-end connections, reliability and flow control
Media
layers
Packet/Datagram3. NetworkPath determination and logical addressing
Frame2. Data linkPhysical addressing
Bit1. PhysicalMedia, signal and binary transmission

Variables in JAVA


Variables are identifiers associated with values. They are declared by writing the variable's type and name, and are optionally initialized in the same statement by assigning a value.
int myInt;         /* Declaring an uninitialized variable called 'myInt',
                   of type 'int' */
myInt = 35;       // Initializing the variable
int myInt = 35;   // Declaring and initializing the variable at the same time
Multiple variables of the same type can be declared and initialized in one statement using comma as a delimiter.
int a, b;         // Declaring multiple variable of the same type
 
int a = 2, b = 3; // Declaring and initializing multiple variables of the same type

Distributed programming and CORBA

What is CORBA?

CORBA, or Common Object Request Broker Architecture, is a standard architecture for distributed object systems. It allows a distributed, heterogeneous collection of objects to interoperate.

The OMG

The Object Management Group (OMG) is responsible for defining CORBA. The OMG comprises over 700 companies and organizations, including almost all the major vendors and developers of distributed object technology, including platform, database, and application vendors as well as software tool and corporate developers.

CORBA Architecture

CORBA defines an architecture for distributed objects. The basic CORBA paradigm is that of a request for services of a distributed object. Everything else defined by the OMG is in terms of this basic paradigm.
The services that an object provides are given by its interface. Interfaces are defined in OMG's Interface Definition Language (IDL). Distributed objects are identified by object references, which are typed by IDL interfaces.
The figure below graphically depicts a request. A client holds an object reference to a distributed object. The object reference is typed by an interface. In the figure below the object reference is typed by the Rabbit interface. The Object Request Broker, or ORB, delivers the request to the object and returns any results to the client. In the figure, a jump request returns an object reference typed by the AnotherObject interface.


Arrays in Java

An array is a container object that holds a fixed number of values of a single type. The length of an array is established when the array is created. After creation, its length is fixed. You've seen an example of arrays already, in the mainmethod of the "Hello World!" application. This section discusses arrays in greater detail.


An array of ten elements


class ArrayDemo {
public static void main (String[ ] args){
//declares an array of integers
Int [ ] anArray;
//allocates memory for 3 integers
anArray = new int[10];
//initialize first element
anArray[0] = 100;
//etc.
anArray[1] = 200;
anArray[2] = 300;

System.out.println(“Element at index 0: ” + anArray[0]);
System.out.println(“Element at index 1: ” + anArray[1]);
System.out.println(“Element at index 2: ” + anArray[2]);              
}   
}

The output from this program is:

Element at index 0: 100
Element at index 1: 200
Element at index 2: 300

Windows Server

Adding a client to a Windows Server


For a step by step tutorial about Windows Server 2003 visit http://www.visualwin.com/.All rights belongs to the owner of the website.

Networking with Java


There are several communications mechanisms that we can use to provide network services. We could use UDP (unreliable datagram protocol), or TCP (transfer-control protocol). For the purposes of this tutorial, we'll choose TCP, because it makes life much easier. TCP guarantees that messages will arrive at their destination. UDP is unreliable, and your application isn't notified if the message is lost in transit. Also, many protocols (such as HTTP, SMTP, POP & FTP) use TCP, so it's important that you are familiar with it for networking in Java.

Internet Addressing with Java

Handling internet addresses (domain names, and IP addresses) is made easy with Java. Internet addresses are represented in Java by the InetAddress class. InetAddress provides simple methods to convert between domain names, and numbered addresses.
We start by importing the java.net package, which contains a set of pre-written networking routines (including InetAddress).
import java.net.*;
Next, we declare a new variable of type InetAddress, which we assign the value of the local host machine (for machines not connected to a network, this should represent 127.0.0.1). Due to the fact that InetAddresses can generate exceptions, we must place this code between a try .. catch UnknownHostException block.
// Obtain the InetAddress of the computer on which this program is running
InetAddress localaddr = InetAddress.getLocalHost();
The InetAddress class has methods that return the IP address as an array of bytes (which can be easily converted into a string), as well as a string representation of its domain name (e.g. mydomain.org ). We can print out the InternetAddress, as well as the domain name of the local address.
System.out.println ("Local IP Address : " + localaddr );
System.out.println ("Local hostname : " + localaddr.getHostName());

Networking with Java


How do computers talk to each other via the Internet?

The Internet is composed of millions of computers, located all across the globe, communicating and transmitting information over a variety of computing systems, platforms, and networking equipment.  Each of these computers (unless they are connecting via an intranet) will have a unique IP address.
IP addresses are 32-bit numbers, containing four octets (8 bit numbers) separated by a full stop. Each computer with a direct internet connection will have a unique IP address, (e.g. 207.68.156.61). Some computers have temporary addresses, such as when you connect to your ISP through a modem. Others have permanent addresses, and some even have their own unique domain names (e.g.www.microsoft.com).
An IP address allows us to uniquely identify a device or system connected to the Internet. If I wanted to connect to a specific IP address, and send a message, I could do so. Without an IP address, my message would have no way of reaching its destination - a bit like leaving the address off a letter or parcel.
Often, computers connected to the Internet provide services. This page is provided by a web server, for example. Because computers are capable of providing more than one type of service, we need a way to uniquely identify each service. Like an IP address, we use a number. We call this number a port. Common services (such as HTTP, FTP, Telnet, SMTP) have well known port numbers. For example, most web servers use port 80. Of course, you can use any port you like - there's no rule that says you must use 80.
diagram
Figure 1.0 - Ports help computers identify which service data is for.

Wednesday 8 August 2012

Bellman Ford routing algorithm

The Bellman–Ford algorithm computes single-source shortest paths in a weighted digraph. For graphs with only non-negative edge weights, the faster Djikstra's algorithm also solves the problem. Thus, Bellman–Ford is used primarily for graphs with negative edge weights. The algorithm is named after its developers, Richard Bellman and Lester Ford J.
Negative edge weights are found in various applications of graphs, hence the usefulness of this algorithm. However, if a graph contains a "negative cycle", i.e., a cycle whose edges sum to a negative value, then walks of arbitrarily low weight can be constructed by repeatedly following the cycle, so there may not be a shortest path. In such a case, the Bellman-Ford algorithm can detect negative cycles and report their existence, but it cannot produce a correct "shortest path" answer if a negative cycle is reachable from the source.

Algorithm

Bellman–Ford is based on dynamic programming approach. In its basic structure it is similar to Dijkstra's Algorithm, but instead of greedily selecting the minimum-weight node not yet processed to relax, it simply relaxes all the edges, and does this |V | − 1 times, where |V | is the number of vertices in the graph. The repetitions allow minimum distances to propagate accurately throughout the graph, since, in the absence of negative cycles, the shortest path can visit each node at most only once. Unlike the greedy approach, which depends on certain structural assumptions derived from positive weights, this straightforward approach extends to the general case.
Bellman–Ford runs in O(|V|·|E|) time, where |V| and |E| are the number of vertices and edges respectively.
procedure BellmanFord(list vertices, list edges, vertex source)
   // This implementation takes in a graph, represented as lists of vertices
   // and edges, and modifies the vertices so that their distance and
   // predecessor attributes store the shortest paths.

   // Step 1: initialize graph
   for each vertex v in vertices:
       if v is source then v.distance := 0
       else v.distance := infinity
       v.predecessor := null

   // Step 2: relax edges repeatedly
   for i from 1 to size(vertices)-1:
       for each edge uv in edges: // uv is the edge from u to v
           u := uv.source
           v := uv.destination
           if u.distance + uv.weight < v.distance:
               v.distance := u.distance + uv.weight
               v.predecessor := u

   // Step 3: check for negative-weight cycles
   for each edge uv in edges:
       u := uv.source
       v := uv.destination
       if u.distance + uv.weight < v.distance:
           error "Graph contains a negative-weight cycle"

Intranets and Extranets

Intranets and extranets
Intranets and extranets are parts or extensions of a computer network, usually a LAN.
An intranet is a set of networks, using the Internet Protocol and IP-based tools such as web browsers and file transfer applications, that is under the control of a single administrative entity. That administrative entity closes the intranet to all but specific, authorized users. Most commonly, an intranet is the internal network of an organization. A large intranet will typically have at least one web server to provide users with organizational information.
An extranet is a network that is limited in scope to a single organization or entity and also has limited connections to the networks of one or more other usually, but not necessarily, trusted organizations or entities—a company's customers may be given access to some part of its intranet—while at the same time the customers may not be considered trustedfrom a security standpoint. Technically, an extranet may also be categorized as a CAN, MAN, WAN, or other type of network, although an extranet cannot consist of a single LAN; it must have at least one connection with an external network.
Simple example of Intranet and Extranet configuration